ABRocket is an AI-powered Business Intelligence platform that lets you ask questions about your data in plain English or your native language and get instant answers, charts, and insights. No SQL expertise required.
Here's what you'll do to get up and running:
Sign up with Google and get started instantly.
Connect your data source and train the AI.
Ask questions and explore your data.
Tip: The entire setup takes less than 5 minutes. Sign in with Google and your email is verified automatically.
Sign Up & Log In
- Go to abrocket.cloud and click "Get Started" or navigate to the Sign In page.
- Click "Continue with Google" to sign in with your Google account. Your email is verified automatically.
- You'll be taken to the Chat page — your main workspace.

Note: ABRocket currently supports Google authentication. Your Google account email is verified automatically — you can start using the platform right away.
Forgot Password?
If you use email/password login, click "Forgot password?"on the login page, enter your email, and we'll send you a reset link. The link is valid for a limited time. Click it, set a new password, and log in again.
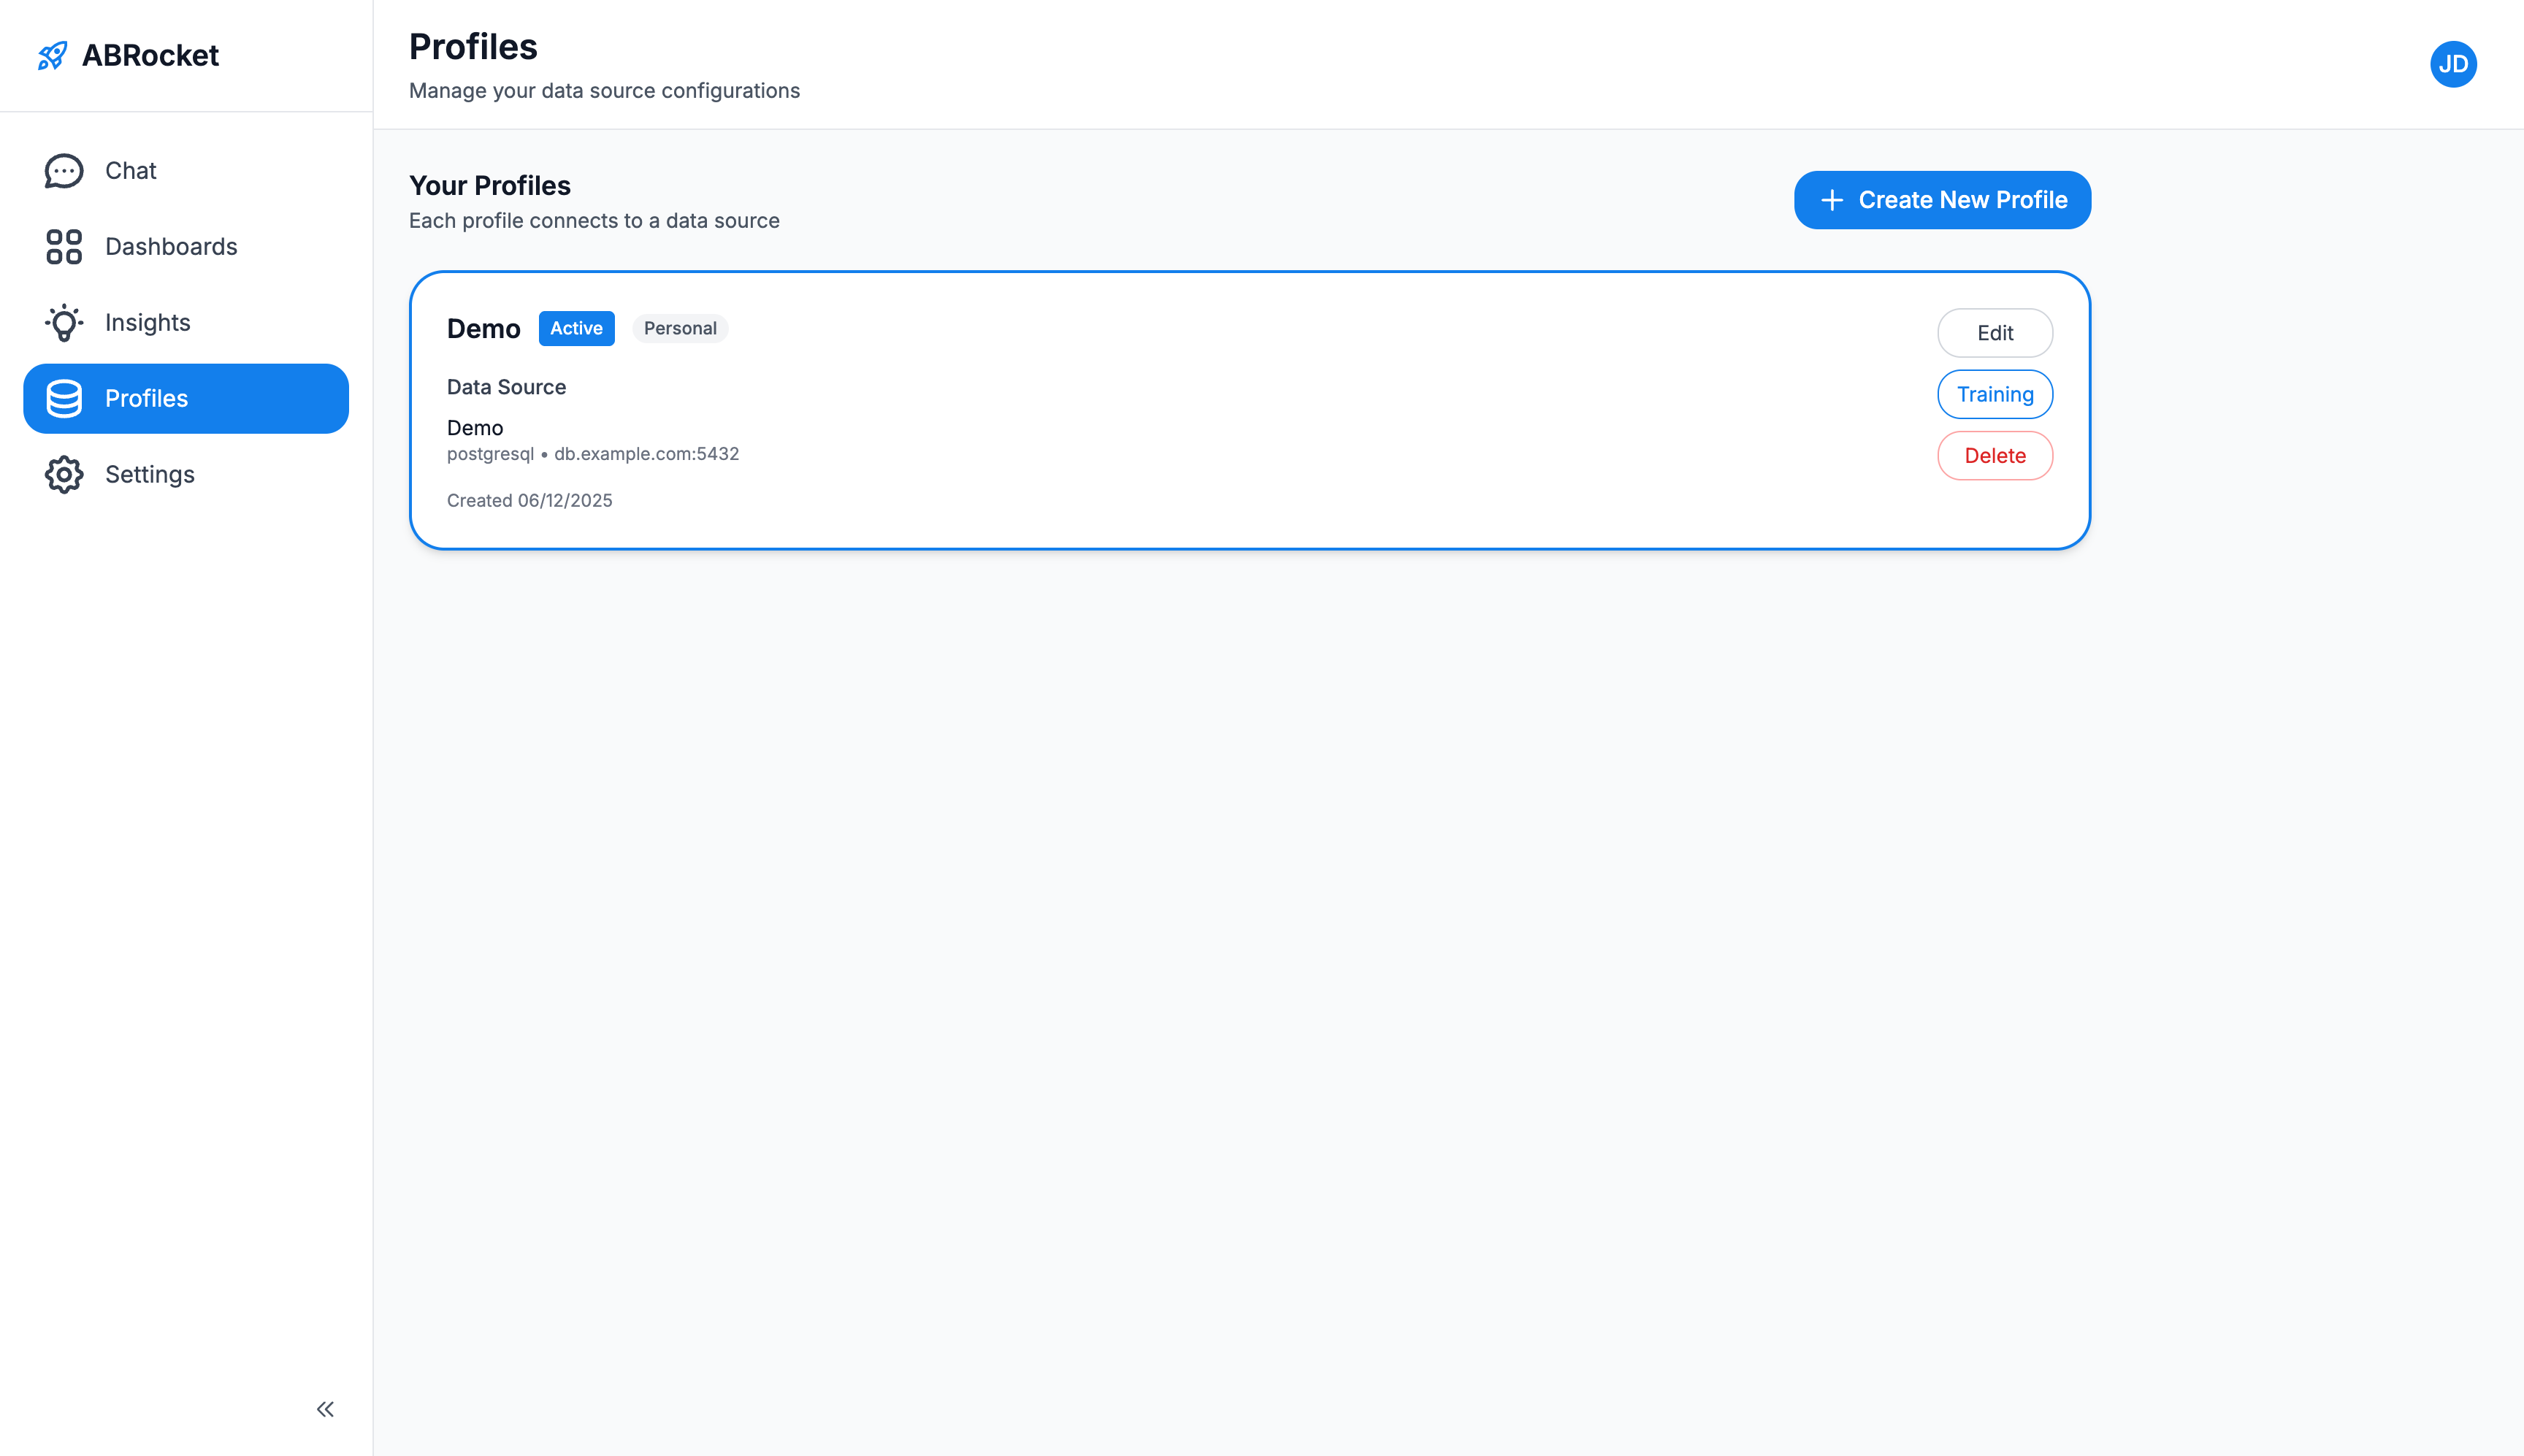
A Profile in ABRocket connects your data source to the ABRocket AI model. Before you can start asking questions, you need at least one active profile.
Connect Your Data Source
Navigate to the Profiles page from the left sidebar. Click "Create New Profile" to start the setup.
ABRocket supports 7 data source types:
PostgreSQL
MySQL
MSSQL
Oracle
Snowflake
BigQuery
Google Sheets
Select your database type and enter the connection details:
For SQL databases (PostgreSQL, MySQL, MSSQL, Oracle):
- Connection Name — A friendly name (e.g., "Production Analytics").
- Host — Database server hostname or IP address.
- Port — Database port (e.g., 5432 for PostgreSQL, 3306 for MySQL, 1433 for MSSQL, 1521 for Oracle).
- Database — Name of the database.
- Schema — Database schema to query (default: "public").
- Username & Password — Your database credentials.
- SSL Mode — Optional SSL configuration for secure connections.
For Snowflake:
- Account Identifier — Your Snowflake account ID.
- Warehouse — Compute warehouse to use.
- Database & Schema — Target database and schema.
- Role — Snowflake role for access control.
- Username & Password — Your Snowflake credentials.
For BigQuery:
- Project ID — Your Google Cloud project ID.
- Dataset — Target BigQuery dataset.
- Service Account Credentials — Upload your JSON service account key.
For Google Sheets:
- Spreadsheet URL — The URL of your Google Sheet.
- Authorize with Google — Click to grant ABRocket read access via OAuth.
Tip: For security, we recommend using a read-only database user for your connection. ABRocket only needs SELECT permissions to analyze your data.
Managing Profiles
On the Profilespage, you can see all your configured profiles. Each profile shows the data source type, connection details, and whether it's the active profile.
- Set as Active — Click to make a profile your active configuration. The AI Chat will use this profile's data source.
- Edit — Update the database connection settings.
- Training — Teach the AI about your data (see next section).
- Delete — Remove a profile you no longer need.
Note: Only one profile can be active at a time. Changing the active profile immediately affects which data source the Chat uses.
Training helps ABRocket understand your specific database structure, business terminology, and query patterns. The better you train it, the more accurate your results will be.
Click the "Training" button on any profile card to open the training modal. You can add four types of training data:
Provide your table CREATE statements so ABRocket understands your schema — table names, columns, data types, and relationships.
CREATE TABLE orders (id SERIAL PRIMARY KEY, customer_id INT, total DECIMAL, created_at TIMESTAMP);Add business context and documentation — explain what tables mean, business rules, metrics definitions, and domain-specific terminology.
The "orders" table stores all customer purchases. The "total" column is in USD. Active customers are those with orders in the last 90 days.Provide example SQL queries that are commonly used in your organization. This helps ABRocket learn your query patterns and preferred SQL style.
SELECT date_trunc('month', created_at) AS month, SUM(total) AS revenue FROM orders GROUP BY 1 ORDER BY 1;Provide natural language questions paired with the correct SQL query. This is the most powerful training method — it teaches ABRocket exactly how to translate your team's questions into SQL.
Question:
"What is the monthly revenue for this year?"
SQL:
SELECT date_trunc('month', created_at) AS month, SUM(total) FROM orders WHERE created_at >= '2025-01-01' GROUP BY 1;Managing Training Data
In the training modal, switch to the "View Training Data"tab to see all training entries you've added. You can delete individual entries that are no longer relevant.
Tip: Start with DDL and Documentation to give ABRocket a solid understanding of your data. Then add Question-SQL pairs for your most common queries. The more training data you provide, the more accurate the AI responses become.
The Chat page is your main workspace. Ask questions about your data in plain English or your native language, and ABRocket will generate SQL, run it against your database, and present the results.
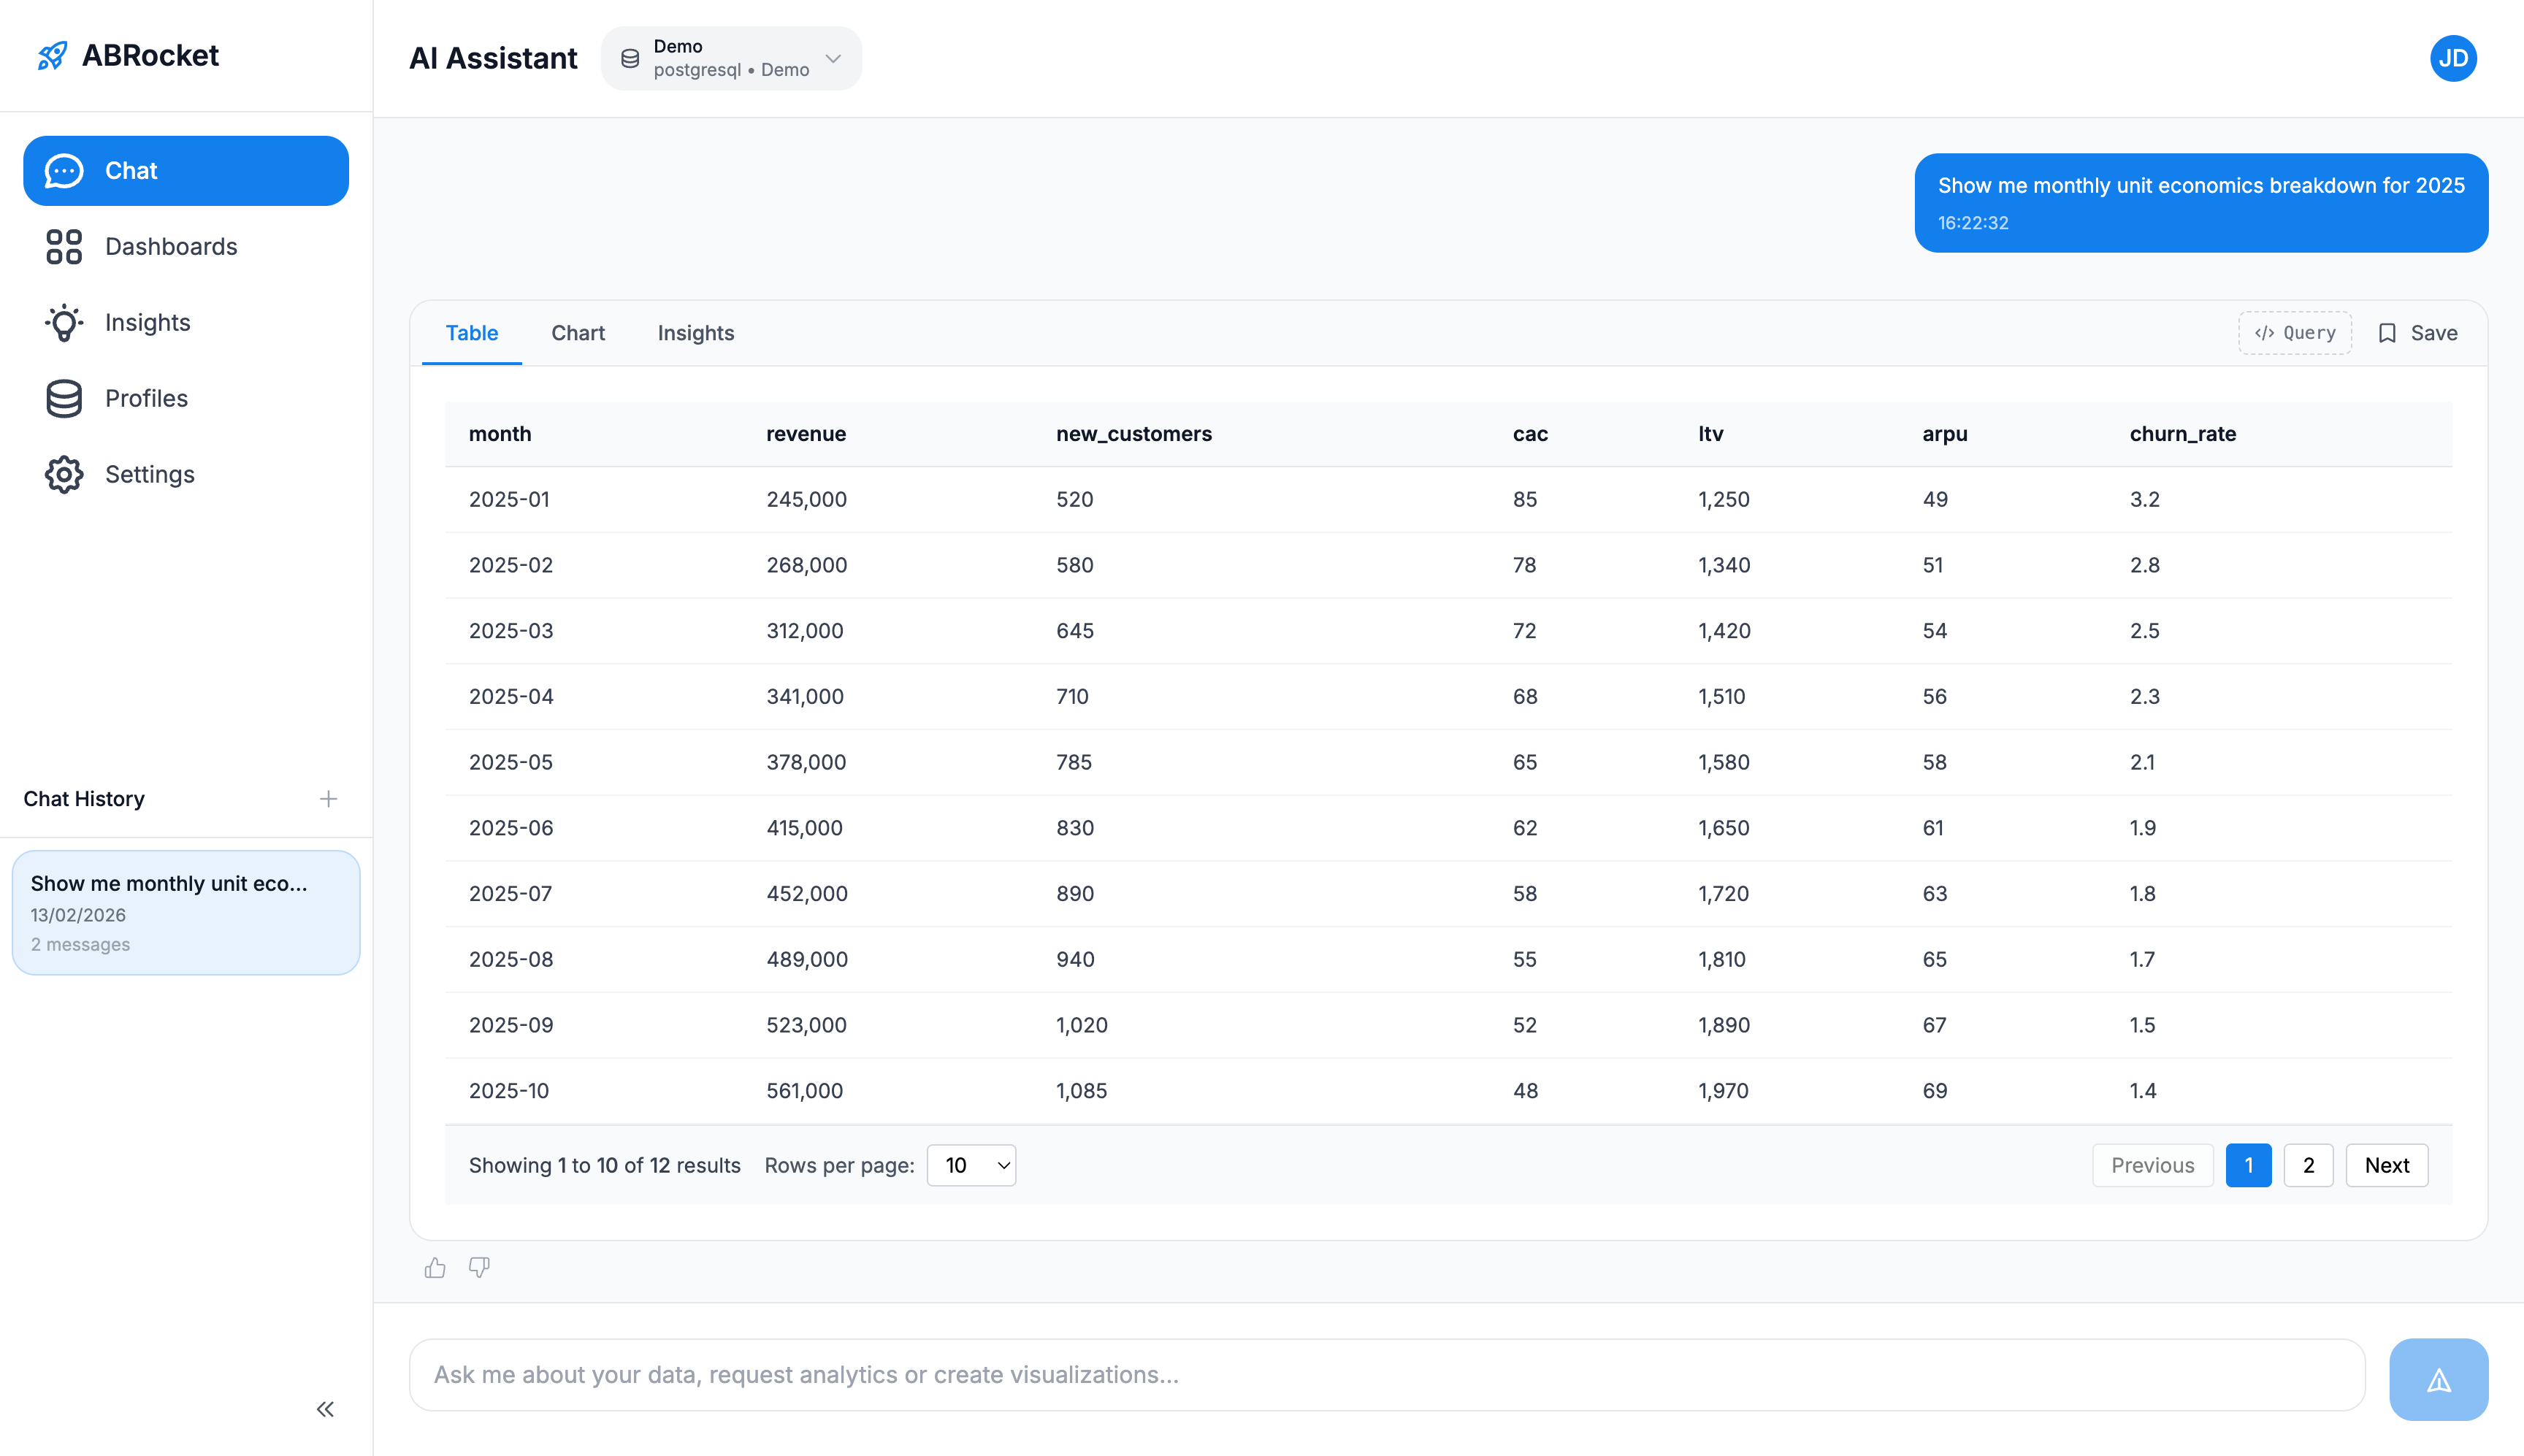
Asking Questions
- Navigate to Chat from the left sidebar.
- Make sure the correct profile is selected in the profile selector at the top of the page.
- Type your question in the input field at the bottom. For example:
- "What were the top 5 products by revenue last month?"
- "Show me daily active users for the past 30 days"
- "Compare sales in Q1 vs Q2 this year"
- Press Enter or click the send button.
- ABRocket will process your question, generate a SQL query, execute it, and return the results.
Viewing Results
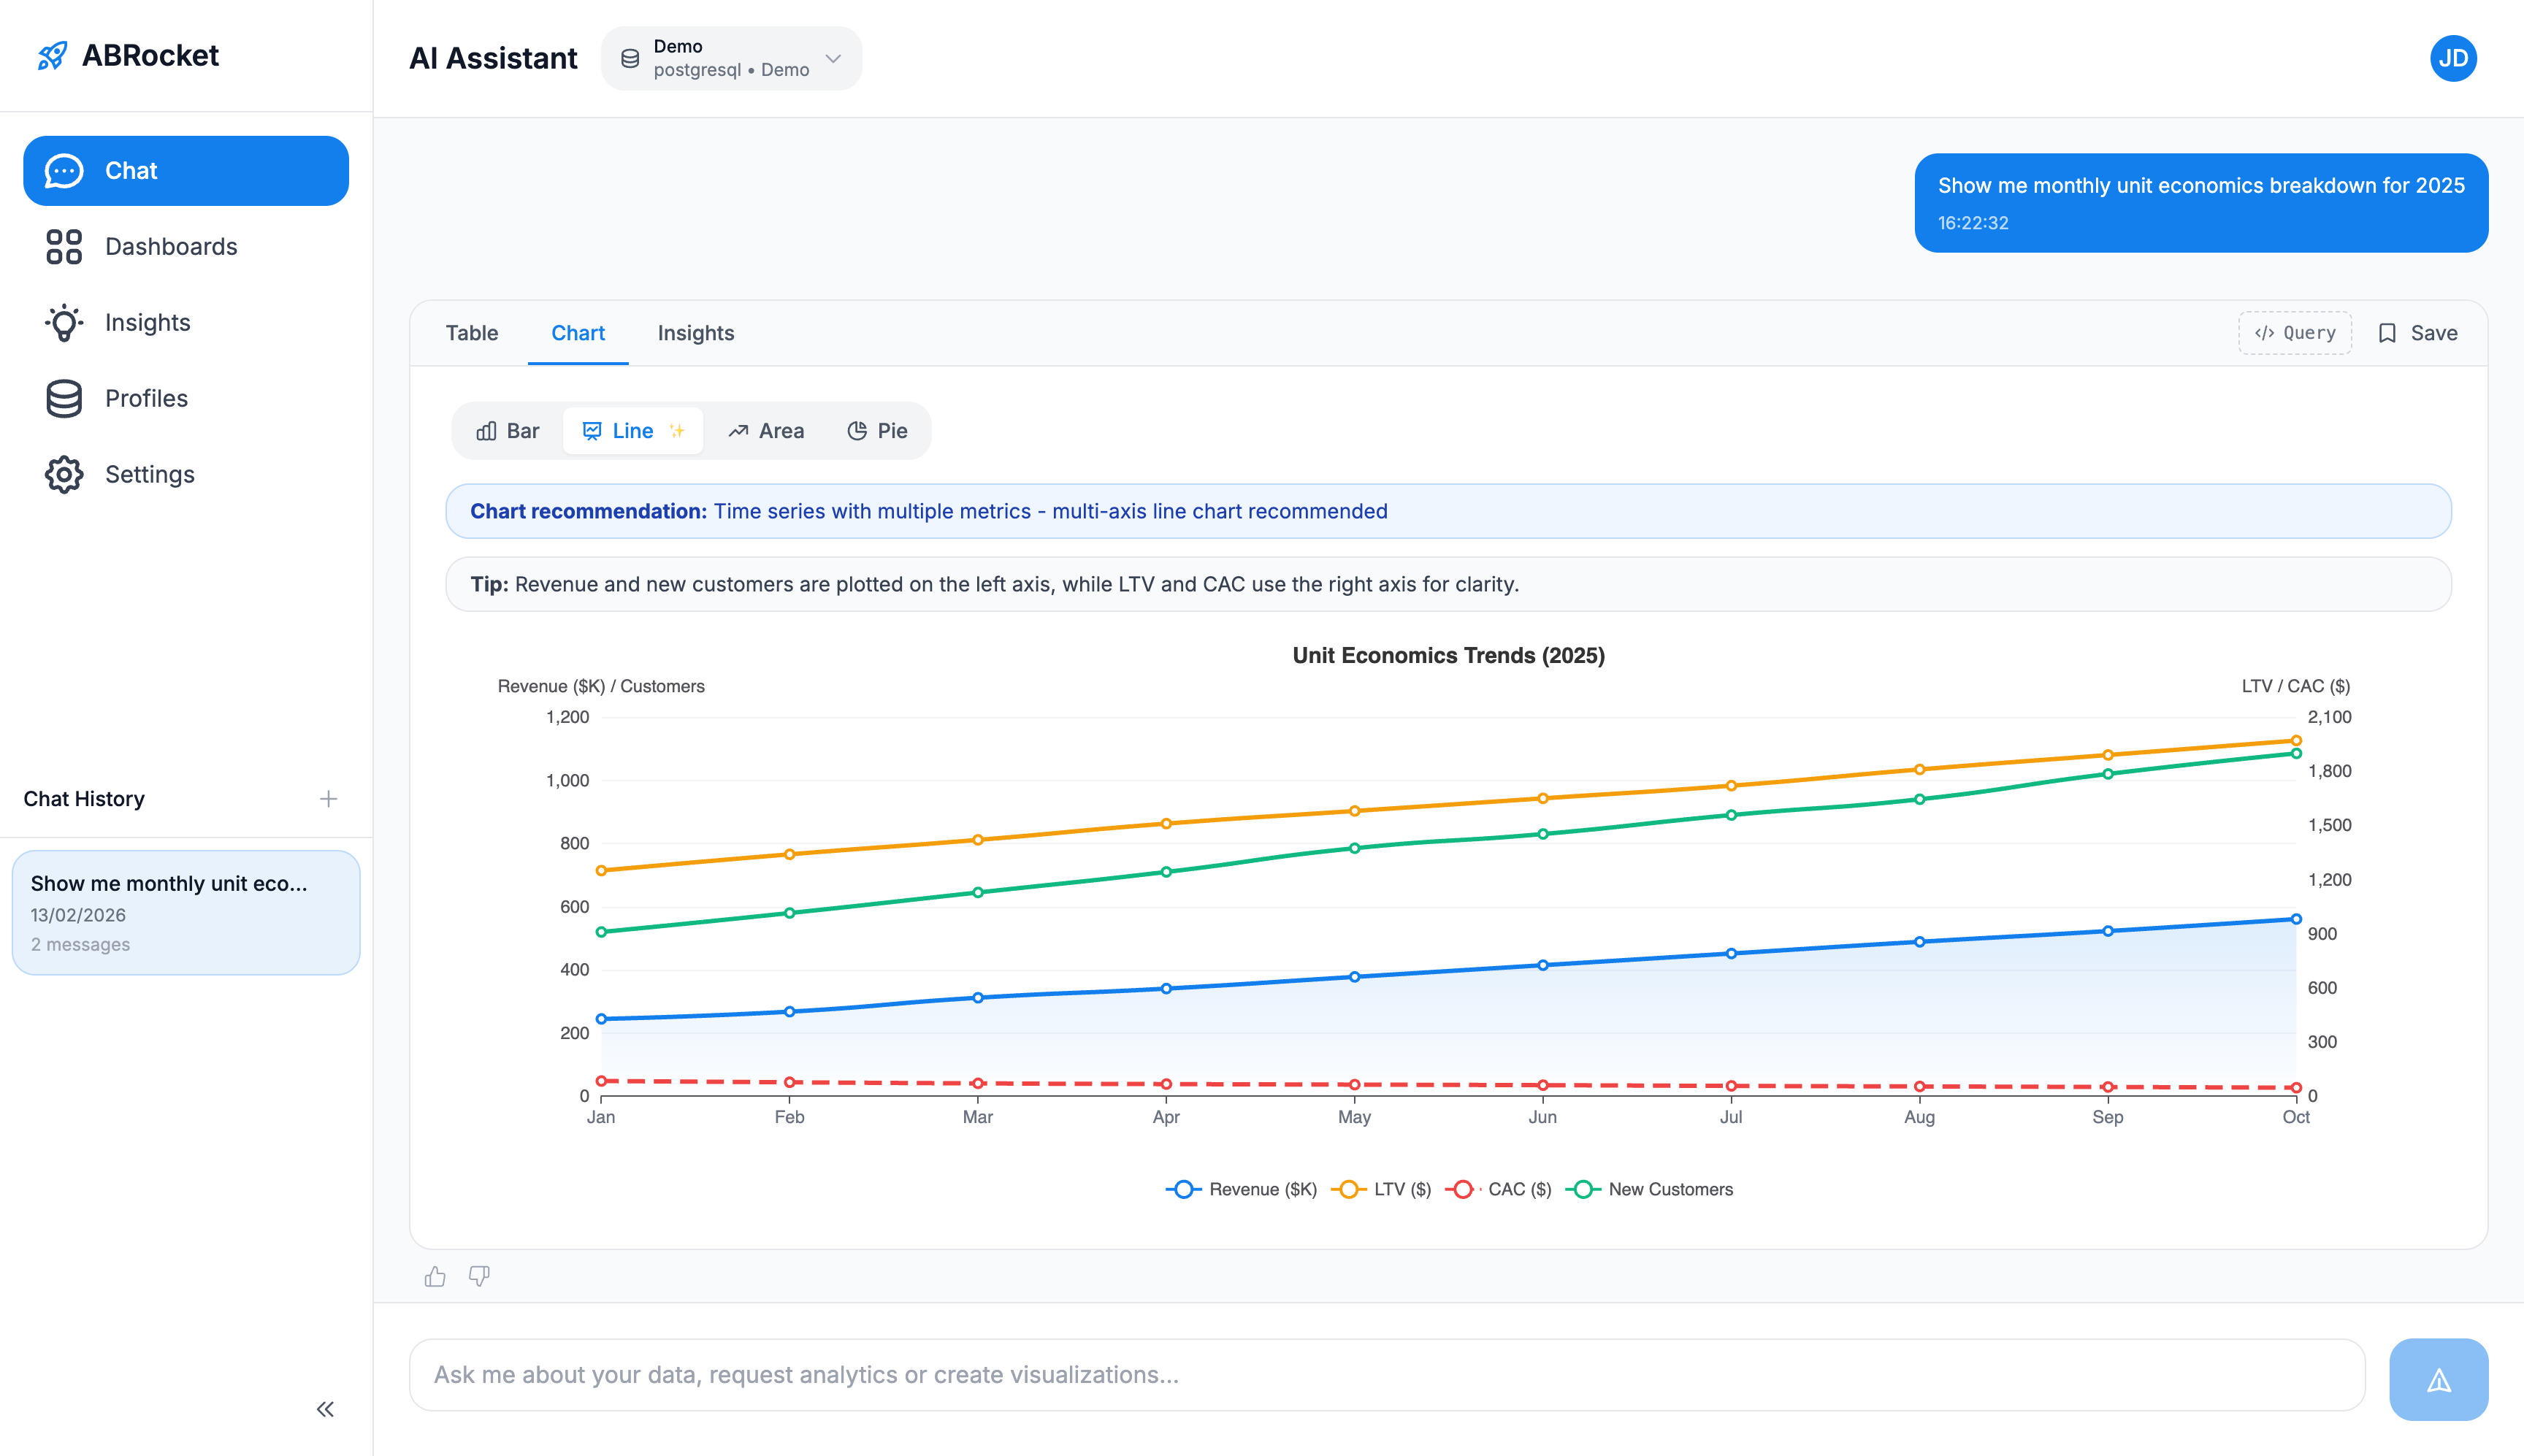
Each AI response includes multiple tabs for different views of your data:
View your results in a paginated data table with sortable columns. Great for exploring raw numbers and exact values. You can save this table view directly to a dashboard.
See your data visualized as a chart. ABRocket automatically recommends the best chart type, but you can switch between Bar, Line, Area, and Pie charts. Save the chart to a dashboard with one click.
View the SQL query that was generated. Use the copy button in the top-right corner to copy the query to your clipboard for use elsewhere.
Get AI-generated insights about your data — trends, opportunities, risks, and recommendations. Save interesting insights to your collections for future reference.
Saving from Chat
Each tab has its own save option:
- Table tab — Click "Save" to add the data table to a dashboard.
- Chart tab — Click "Save" to add the chart visualization to a dashboard.
- Insights tab — Click "Save Insight" to save the AI-generated insight to a collection.
- Query tab — Use the copy button to copy the SQL query.
Chat History
All your conversations are saved in the Chat History panel on the left side. Click any previous chat to continue the conversation. Use the "New Chat" button to start a fresh conversation. You can also delete old chats you no longer need.
Tip:The save button is context-aware. Saving from the Table tab saves table data; saving from the Chart tab saves the chart visualization. Make sure you're on the right tab before saving.
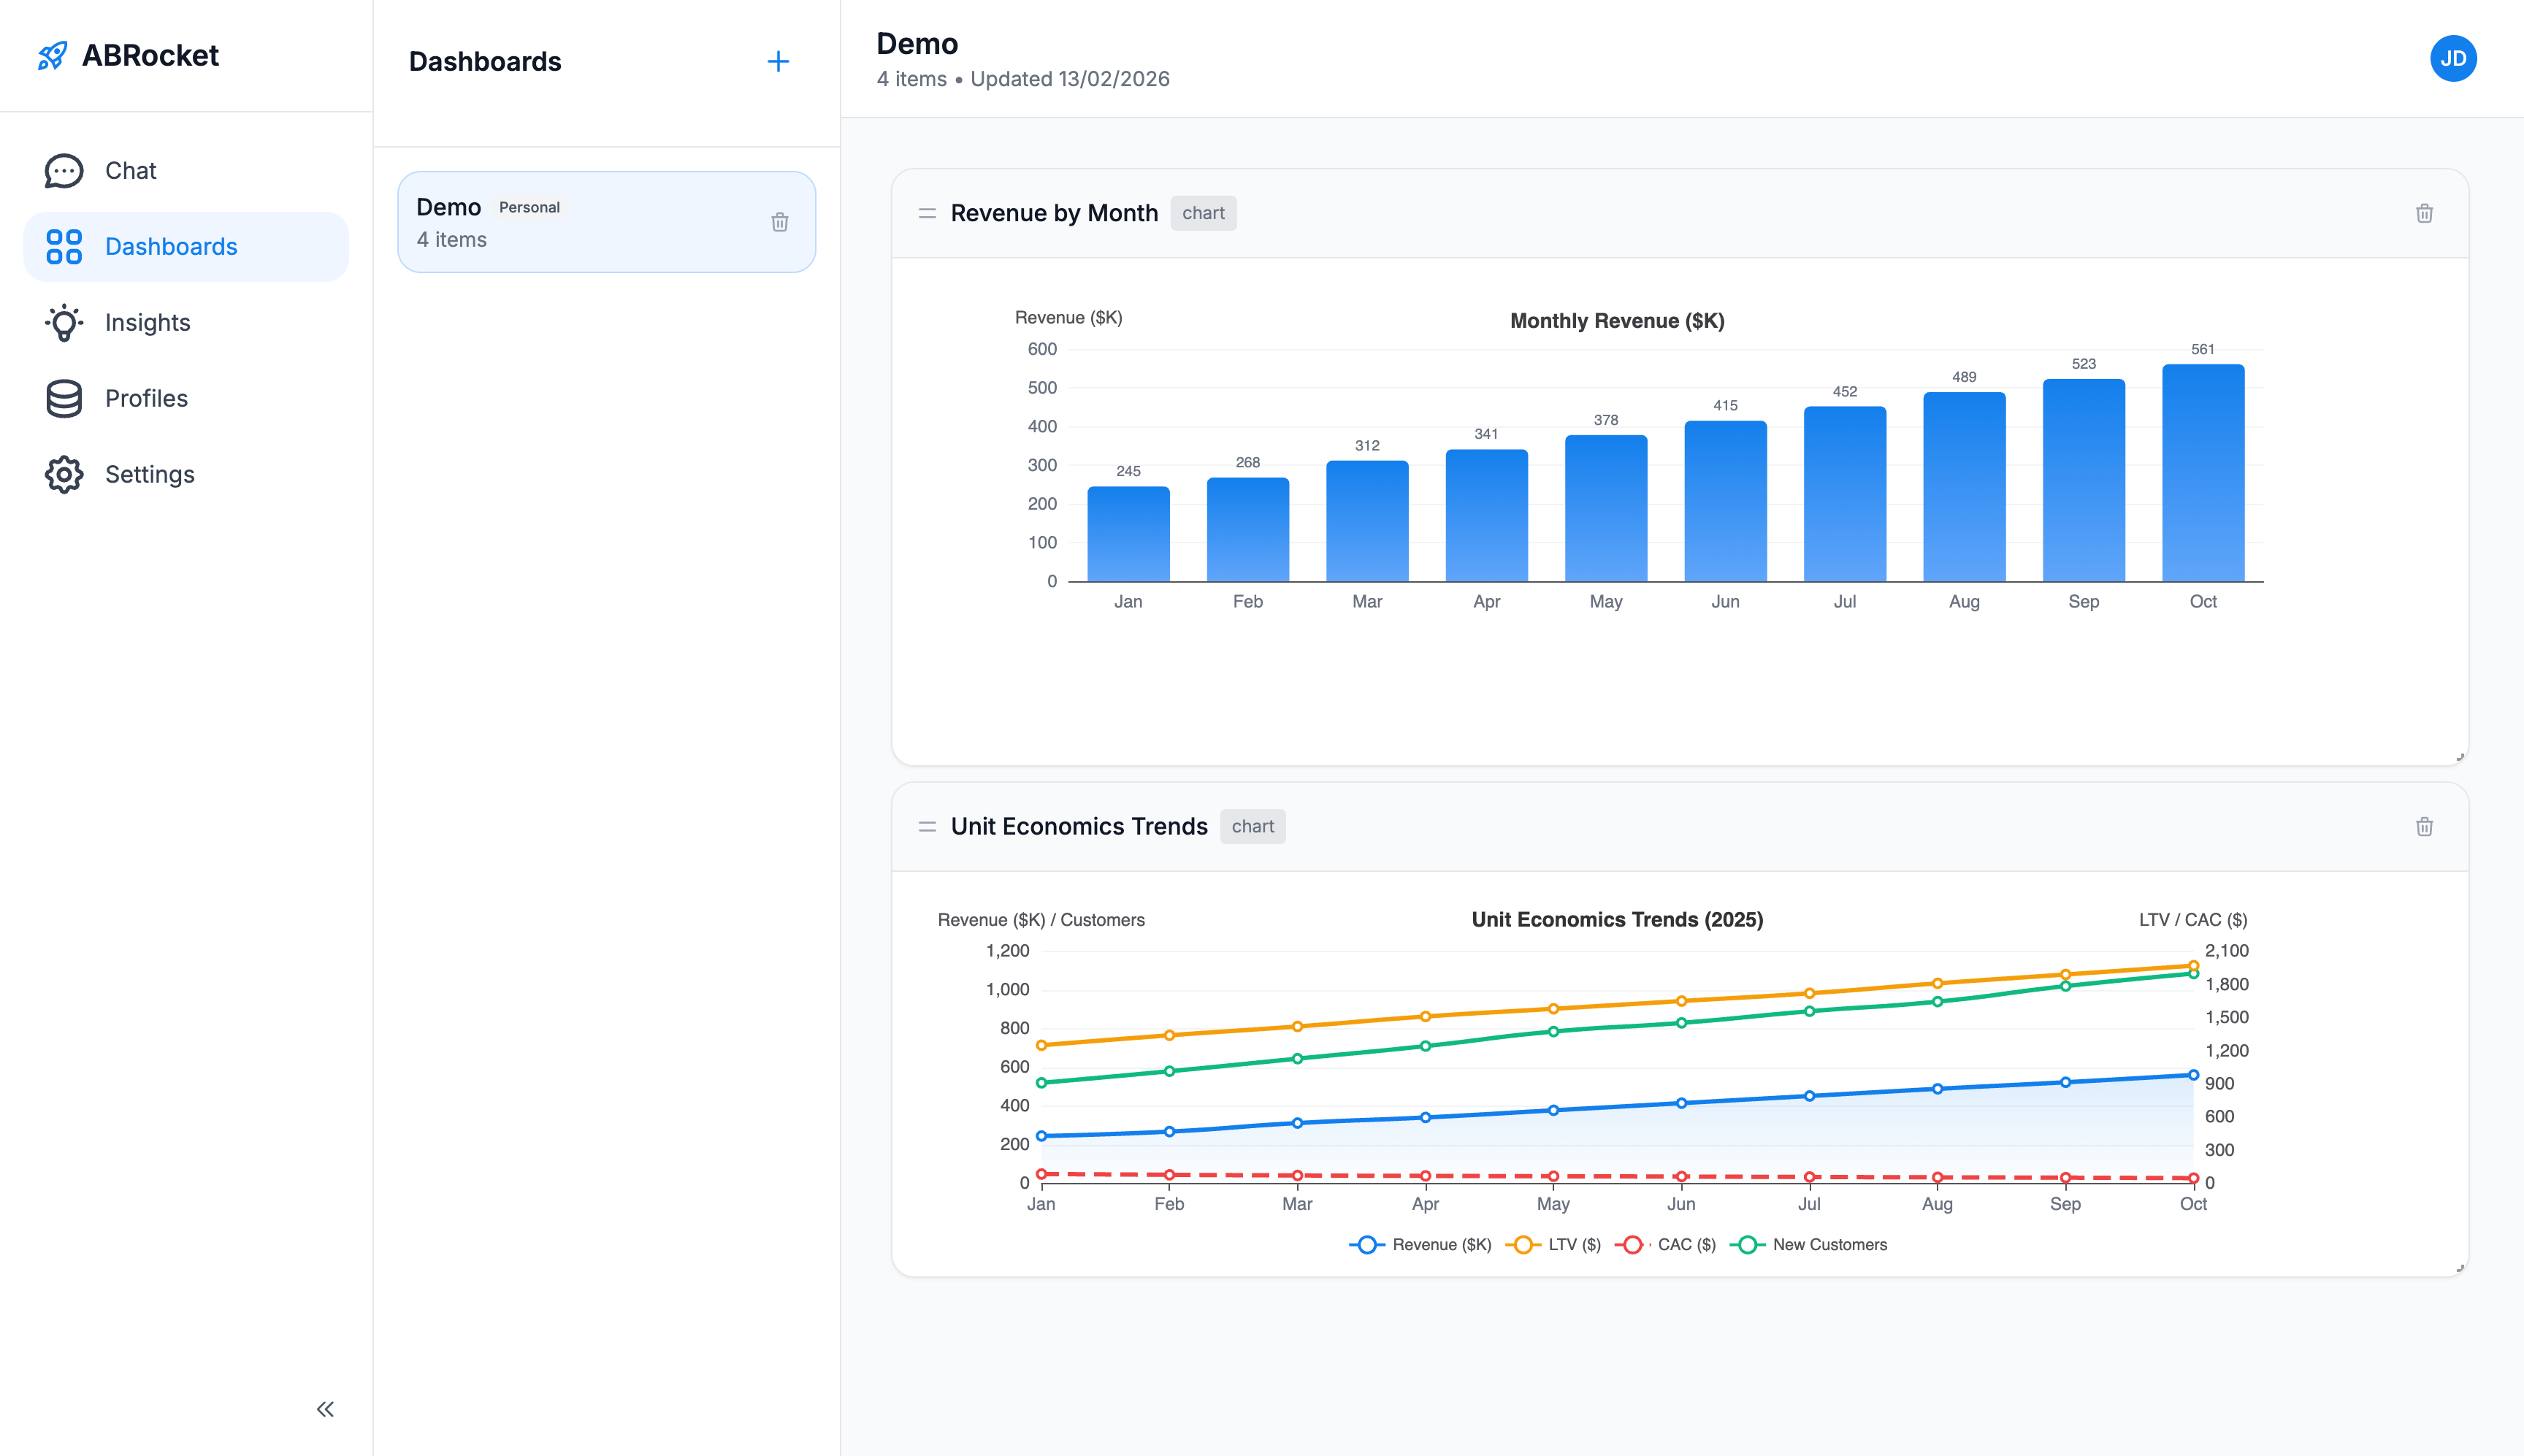
Dashboards let you organize and visualize your saved data items — tables, charts, and metrics — in a customizable layout.
Creating a Dashboard
- Navigate to Dashboards from the left sidebar.
- Click the "+" button next to the Dashboards title.
- Give your dashboard a name.
- Your new dashboard is ready — start adding items from the Chat page.
Adding Items to a Dashboard
After getting results in the Chat, switch to the Table or Chart tab and click "Save". Choose which dashboard to add the item to.
Customizing Layout
Dashboard items can be rearranged and resized:
- Drag & Drop — Click and hold any item's header to drag it to a new position.
- Resize — Drag the bottom-right corner of any item to resize it.
- Delete — Click the trash icon on any item to remove it from the dashboard.
Your layout changes are saved automatically.
Managing Dashboards
- Switch — Click any dashboard in the sidebar list to open it.
- Delete — Click the trash icon next to a dashboard name to remove it and all its items.
The Insightspage stores AI-generated business intelligence that you've saved from the Chat. Insights are organized into collections and can be filtered by category and impact level.
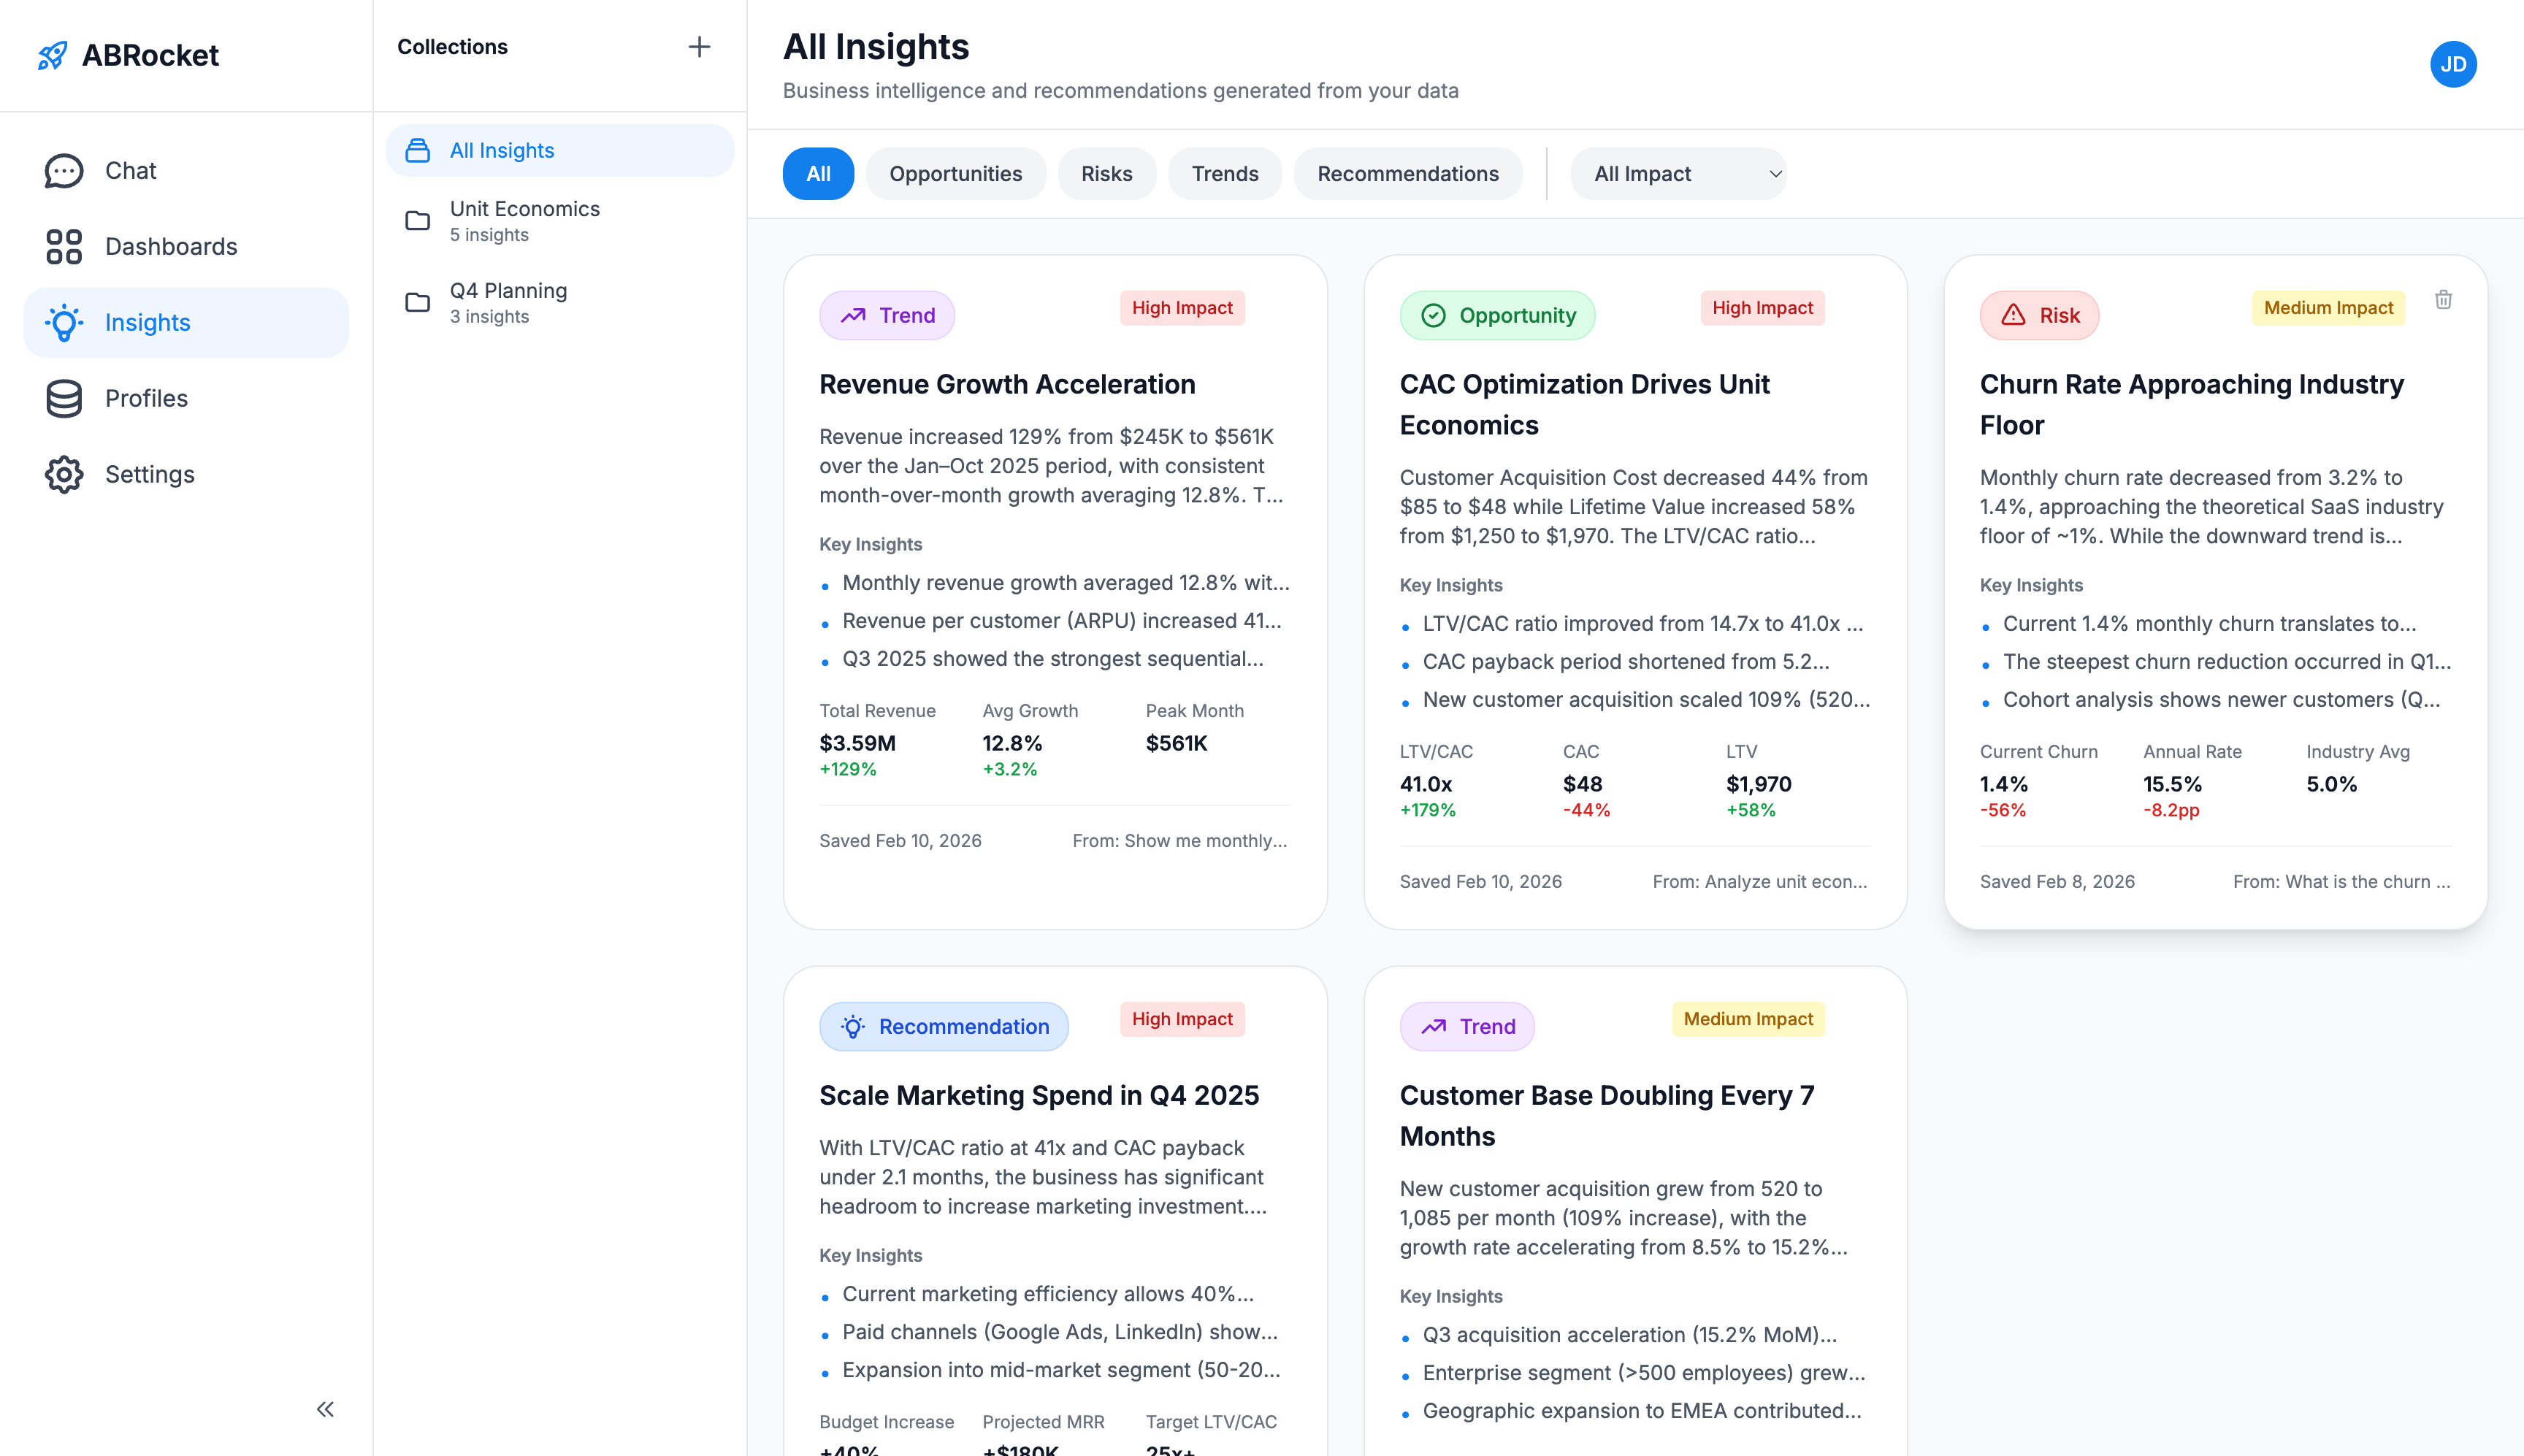
Saving an Insight
- In the Chat, after receiving results, switch to the Insights tab.
- Review the AI-generated insights — they include a summary, key findings, trends, and recommendations.
- Click "Save Insight" to save it to a collection.
- Choose an existing collection or create a new one.
Working with Collections
Collections help you organize insights by topic, project, or team:
- Create Collection — Click the "+" button in the Collections sidebar and give it a name.
- Switch Collections — Click any collection in the sidebar to view its insights.
- All Insights — Click "All Insights" to see insights across all collections.
- Delete Collection — Click the trash icon to remove a collection.
Filtering Insights
Use the filter buttons at the top of the Insights page to narrow down what you see:
Opportunities
Growth potential
Risks
Areas of concern
Trends
Patterns over time
Recommendations
Actionable advice
You can also filter by impact level — High, Medium, or Low — using the dropdown to focus on the most critical findings.
Viewing Full Insights
Click any insight card to open a detailed view in a popup window. The full view includes:
- Summary — A brief overview of the finding.
- Key Insights — The most important takeaways.
- Trends — How the data has changed over time.
- Recommendations — Suggested actions based on the analysis.
- Metrics — Key numbers and statistics.
- Source Query — The original question that generated this insight.
The Settings page lets you manage your account, security, workspace, and team.
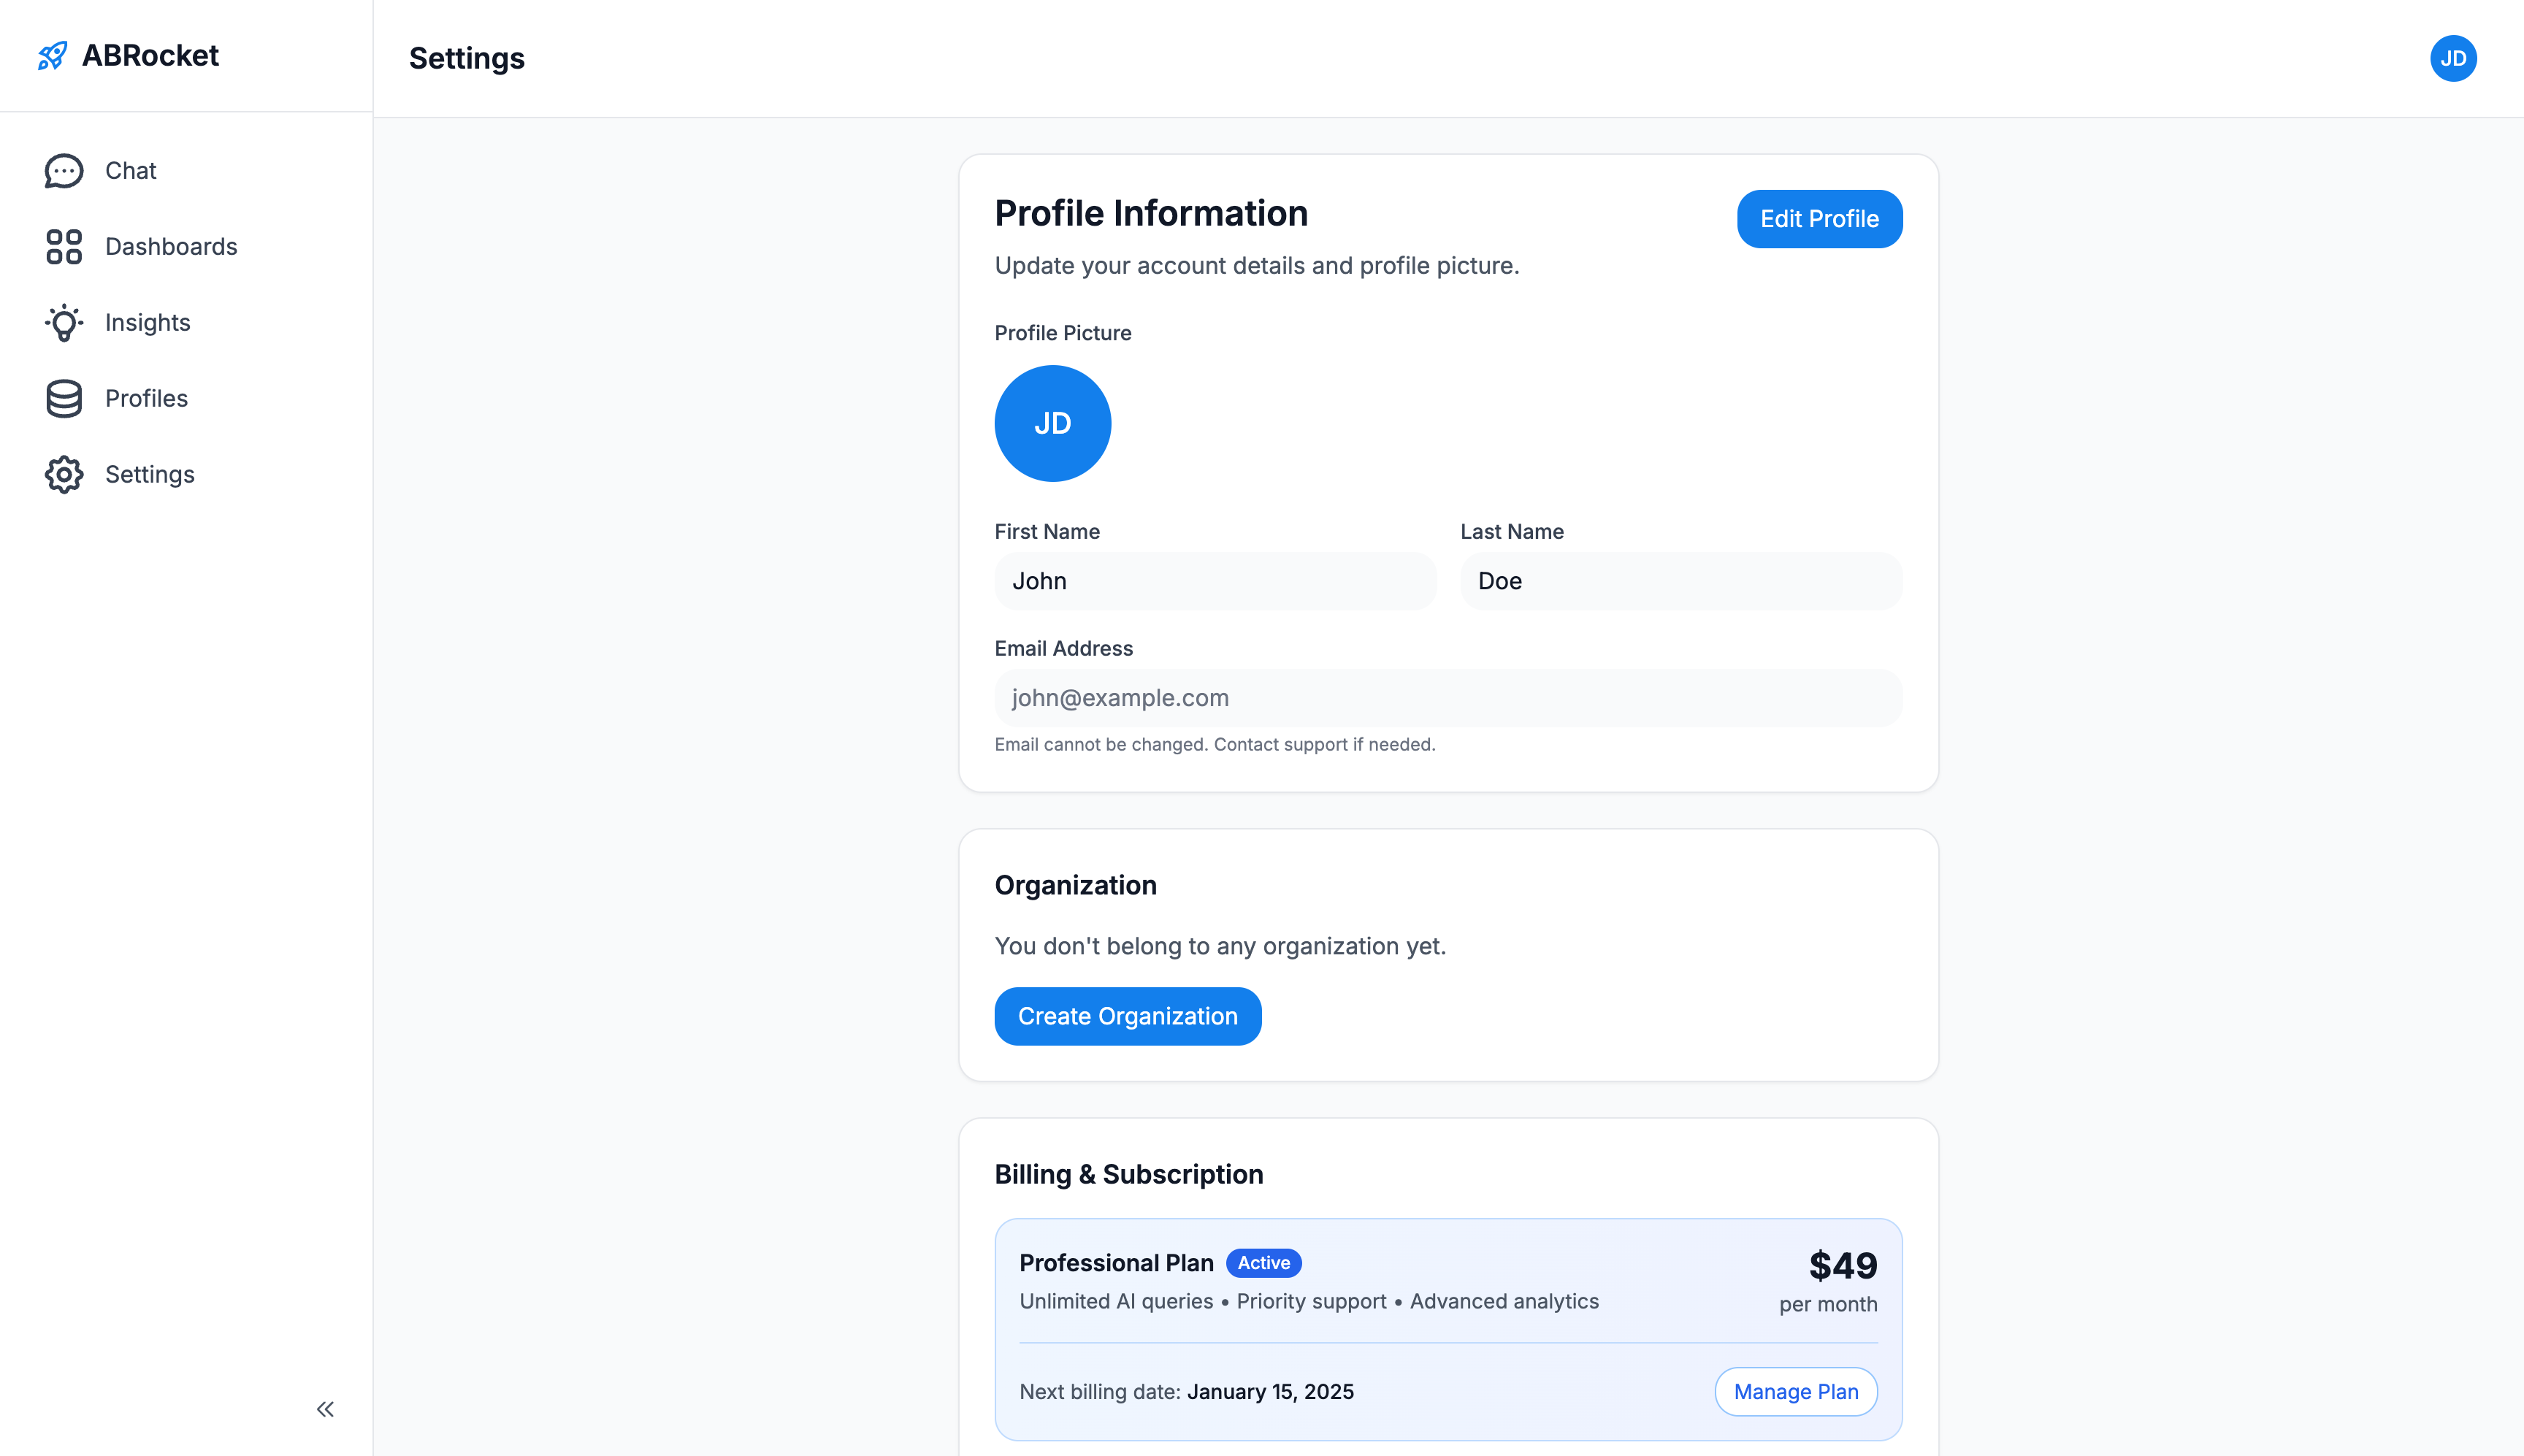
Profile
- Name — Update your first and last name.
- Avatar — Your profile avatar is generated from your initials.
- Email — Your email is shown but cannot be changed. Contact support if you need to update it.
- Change Password — Enter your current password and set a new one. Passwords must be at least 8 characters with a mix of letters, numbers, and symbols.
Two-Factor Authentication (2FA)
Add an extra layer of security to your account with authenticator app-based two-factor authentication:
- Go to Settings and scroll to the Account Security section.
- Click "Enable 2FA".
- Scan the QR code with your authenticator app (e.g., Google Authenticator, Authy, or Microsoft Authenticator).
- Enter the 6-digit code from your authenticator app to verify and activate 2FA.
Once enabled, you'll be asked to enter a 6-digit code from your authenticator app each time you log in. This ensures that even if someone knows your password, they can't access your account without your authenticator device.
Workspace
Manage your workspace settings and team:
- Create Workspace — Set up a new workspace with a name, slug, and description.
- Team Members — View current team members and their roles.
- Invite Members — Send email invitations to add new team members. They'll receive a link to join your workspace.
- Manage Roles — Assign roles (Owner, Admin, Member, Viewer) to control what team members can access.
Billing
The billing section shows your current subscription plan, usage statistics (AI queries, data sources, team members), payment method, and billing history. Upgrade or downgrade your plan as your team's needs change.
Need More Help?
Can't find what you're looking for? Our team is here to help you get the most out of ABRocket.